FE 'tkGooie' Utilities
'IMAGEtools' group
POINTILLATE
IMAGE
from GIF or PNG file
(FE = Freedom Environment)
The FE Pointillate-image 'tkGooie' interface.
It allows for pointillation with rectangles or ovals.
FE 'tkGooie' Utilities'IMAGEtools' group
POINTILLATE
|
The FE Pointillate-image 'tkGooie' interface. It allows for pointillation with rectangles or ovals. |
FE Home Page >
FE Downloads Page >
FE 'tkGooies' Description Page >
FE 'tkGooies' 'IMAGEtools' Page >
This Pointillate-Image tkGooie utility Page
|
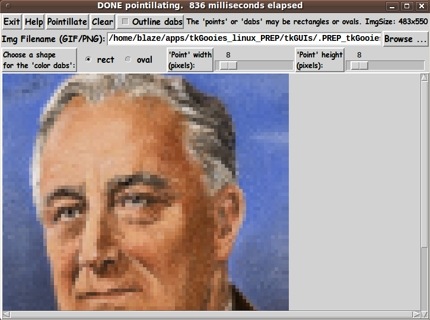
INTRODUCTION to 'pointillateImage' In years past (around 2005 to 2009 --- before I switched to Linux from Microsoft Windows), I used the 'Irfanview' image editor program which had a capability to make a 'pointillated' image from an image file. Using Irfanview, one could create a new image from the original image --- so that the original image looked like it had been converted to an Impressionist painting, by Cezanne or Van Gogh or one of that 'school' of painting. It has been on my 'to do' list for about 10 months to make a Tk canvas GUI utility that could do the same thing. The Tk 'image create photo -file' command will accept image data of several types of 'raster image' files --- GIF, PGM (Portable Gray Map), PPM (Portable Pixel Map), and, starting with Tk 8.6, PNG. Since I am using Tk 8.5 (and PGM and PPM files are hardly used at all nowadays), I was satisfied to aim at doing 'pointillations' of GIF files. For the GUI, I needed (or wanted) several features: ** an entry field for filename, along with a 'Browse...' button --- to use to fetch a filename via the 'tk_getOpenFile' utility. ** a canvas on which to display the image --- as a 'preview'. ** the option to use either ovals or rectangles to make the 'points' or 'dabs' of color. ** the option to choose the size (in pixels) of the dabs --- both width and height. ** a button to use to initiate a 'pointillation' of the image file. ** a label on the GUI in which to display the dimensions of the image file. ** a 'Help' button on the GUI, by which to provide information on the extent of the capabilities of this utility GUI Screenshots I set about making such a GUI, and after several iterations (including adding a checkbutton to allow for outlines, or not, around the 'dabs'), I ended up with the GUI seen in the following image. |
|
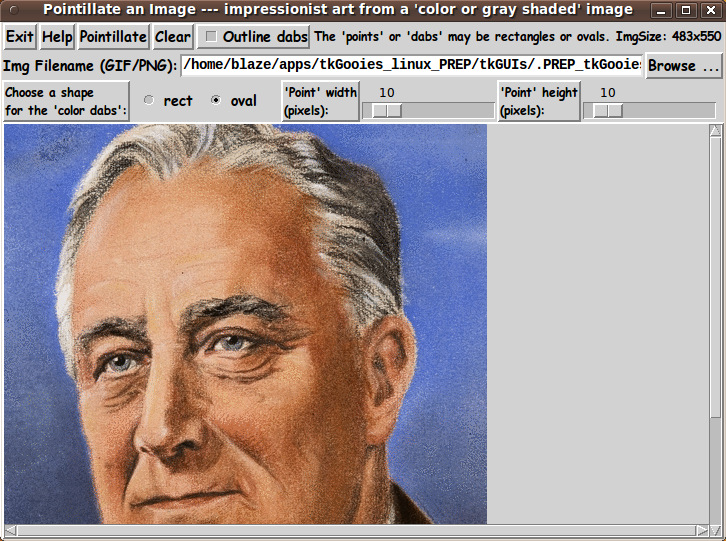
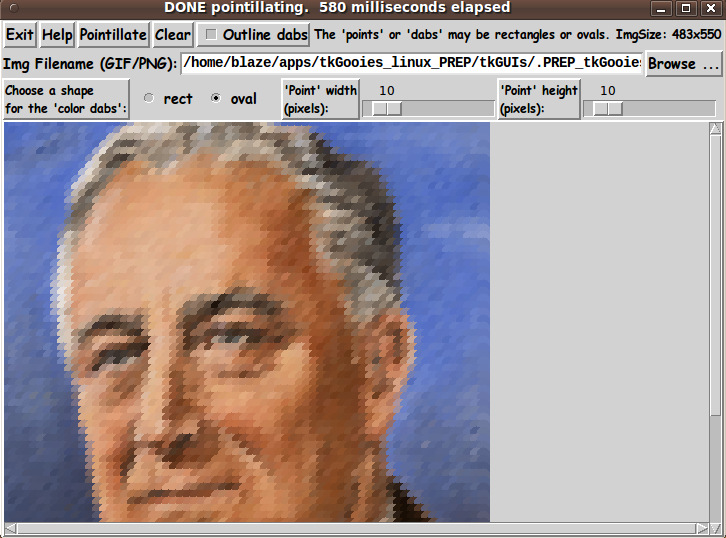
When the GUI first comes up, the canvas is empty. Since pointillism tends to work well on portraits, I found this portrait image and used it for testing. Initially, the GUI is defaulted to draw 'ovals' and to use 10x10 pixel ovals, with no outlines. Here is what I got from the image above, by clicking on the 'Pointillate' button. |
|
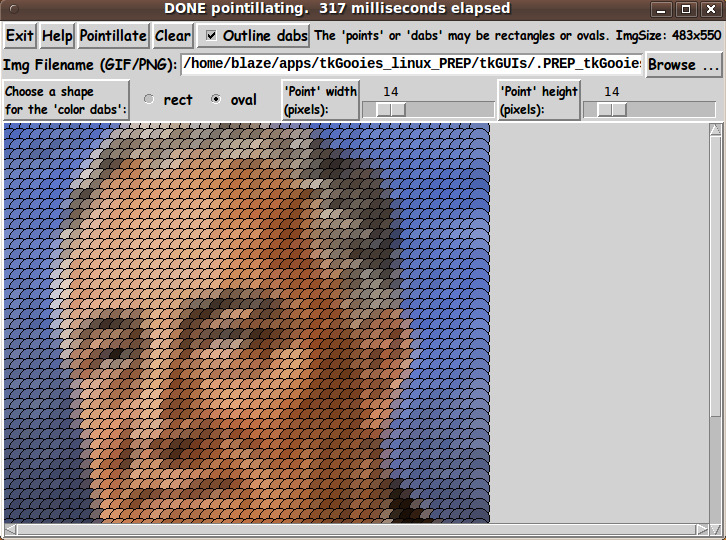
I set the size up to 14x14 and turned on the 'Outline' checkbutton. Another click on the 'Pointillate' button yielded the following image. |
|
And to show what the image looks like when using 'rectangles' instead of 'ovals', here is what I got with size set to 8x8 and outlines turned off. |

|
Note that although the image from the file was put on the Tk canvas with a 'create image' canvas command, the 'dabs' are applied over that image with the 'create oval' and 'create rectangle' commands. CAPTURING THE GENERATED IMAGE: When you get an image that you want to save, a screen/window capture utility (like 'gnome-screenshot' on Linux) can be used to capture the GUI image in a PNG or GIF file, say. If necessary, an image editor (like 'mtpaint' on Linux) can be used to crop the window capture image. The image could also be down-sized --- say to make an icon or 'button' image file. The 'Help' button on the GUI provides pretty complete and detailed help for using the GUI --- including some of the information in the paragraphs above. DESCRIPTION OF THE CODE Below, I provide the Tk script code for this 'pointillate-and-image' utility. I follow my usual 'canonical' structure for Tk code for this Tk script: |
  0) Set general window & widget parms (win-name, win-position,
     win-color-scheme, fonts, widget-geometry-parms, win-size-control,
     text-array-for-labels-etc).

  1a) Define ALL frames (and sub-frames, if any).
  1b) Pack   ALL frames and sub-frames.

  2) Define & pack all widgets in the frames, frame by frame.
              Within each frame, define ALL the widgets.
              Then pack the widgets.

  3) Define keyboard and mouse/touchpad/touch-sensitive-screen action
     BINDINGS, if needed.

  4) Define PROCS, if needed.

  5) Additional GUI initialization (typically with one or more of
     the procs), if needed.
|
This Tk coding structure is discussed in more detail on the page A Canonical Structure for Tk Code --- and variations. This structure makes it easy for me to find code sections --- while generating and testing a Tk script, and when looking for code snippets to include in other scripts (code re-use). I call your attention to step-zero. One new thing that I have started doing recently is using a text-array for text in labels, buttons, and other widgets in the GUI. This can make it easier for people to internationalize my scripts. I will be using a text-array like this in most of my scripts in the future. Experimenting with the GUI As in all my scripts that use the 'pack' geometry manager (which is all of my 100-plus scripts, so far), I provide the four main pack parameters --- '-side', '-anchor', '-fill', '-expand' --- on all of the 'pack' commands for the frames and widgets. That helps me when I am initially testing the behavior of a GUI (the various widgets within it) as I resize the main window. I think that I have used a nice choice of the 'pack' parameters. The label, button, radiobutton, checkbutton, and scale widgets stay fixed in size and relative-location as the window is re-sized --- the filename entry field x-expands whenever the window is x-expanded --- while the canvas area (with its scroll bars) expands/contracts whenever the window is re-sized. You can experiment with the '-side', '-anchor', '-fill', and '-expand' parameters on the 'pack' commands for the various frames and widgets --- to get the widget behavior that you want. --- Additional experimentation: You might want to change the fonts used for the various GUI widgets. For example, you could change '-weight' from 'bold' to 'normal' --- or '-slant' from 'roman' to 'italic'. Or change font families. In fact, you may NEED to change the font families, because the families I used may not be available on your computer --- and the default font that the 'wish' interpreter chooses may not be very pleasing. I use variables to set geometry parameters of widgets --- parameters such as border-widths and padding. And I have included the '-relief' parameter on the definitions of frames and widgets. Feel free to experiment with those 'appearance' parameters as well. Some features in the code That said, here's the code --- with plenty of comments to describe what most of the code-sections are doing. You can look at the top of the PROCS section of the code to see a list of the procs used in this script, along with brief descriptions of how they are called and what they do. The main procs are : |
   'get_img_filename' - called by the 'Browse...' button,
                        to get the filename of an image (GIF,PNG,...) file
                        and
                        then place the image on the canvas.

   'put_img_on_canvas' - called by proc 'get_img_filename' (and perhaps
                         by some bindings), to place the image on the
                         canvas, for the current filename

  'pointillate_img'   - called by the 'Pointillate' button,
                        to 'stride' over the image and create the
                        'dabs' of color over the image --- by using
                        the canvas 'create oval' or 'create rect' command.
                        (See the commented code for details.)

  'popup_msgVarWithScroll' - called by the 'Help' button,
                             to show text in variable $HELPtext.
|
Comments in the Code It is my hope that the copious comments in the code will help Tcl-Tk coding 'newbies' get started in making GUI's like this. Without the comments, potential young Tcler's might be tempted to return to their iPhones and iPads and iPods --- to watch videos of cliff jumpers parasailing into the sides of cliffs, and bouncing down to the canyon below. The CODE Here is a link to CODE for the script 'pointillate_image.tk'. SIMILAR UTILITIES: This is another utility that I can add to a group of 'IMAGEtools' utilities --- presented on the FE 'tkGooies' 'IMAGEtools' Page. See the other image processing utilities on that page. IN CONCLUSION As I have said on several other code-donation pages on this FE web site ... There's a lot to like about a utility that is 'free freedom' --- that is, no-cost and open-source so that you can modify/enhance/fix it without having to wait for someone else to do it for you (which may be never). A BIG THANK YOU to Ousterhout for starting Tcl-Tk, and a BIG THANK YOU to the Tcl-Tk developers and maintainers who have kept the simply MAH-velous 'wish' interpreter going. |
|
Bottom of the page for To return to a previously visited web page location, click on the Back button of your web browser a sufficient number of times. OR, use the History-list option of your web browser. OR ...
< Go to Top of Page, above. >Page history: The code was created in 2013 --- and posted 2013 Aug 22 at http://wiki.tcl.tk/38567.
This FE web page was created 2014 May 07 ---
as a backup and alternative to the wiki.tcl.tk page.
NOTE: |