FE 'tkGooie' Utilities
'IMAGEtools' group
Sketch ON
an image
read from a
GIF or PNG file
(FE = Freedom Environment)
The FE 'Sketch ON' or 'wheeePaint'
'tkGooie' interface.
FE 'tkGooie' Utilities'IMAGEtools' group
Sketch ON
|
The FE 'Sketch ON' or 'wheeePaint' 'tkGooie' interface. |
FE Home Page >
FE Downloads Page >
FE 'tkGooies' Description Page >
FE 'tkGooies' 'IMAGEtools' Page >
This 'Sketch-on-Image' tkGooie utility Page
|
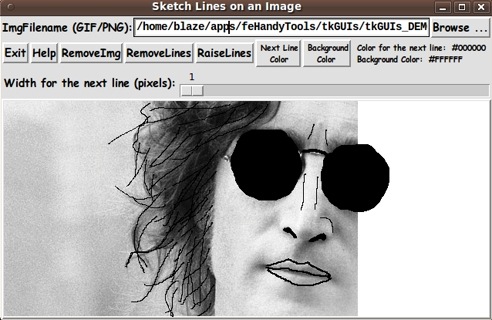
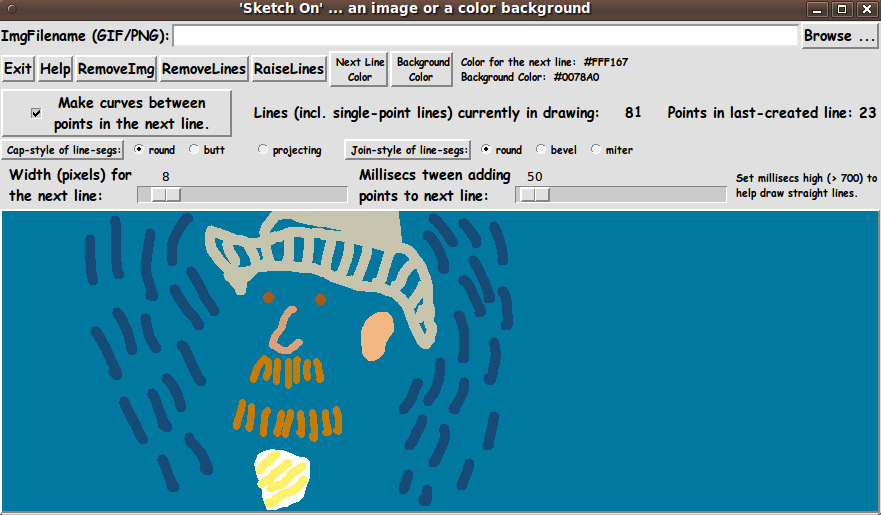
INTRODUCTION to 'sketchONimgFromFile' In 2012, while doing some searches on wiki.tcl.tk for 'canvas' applications, I ran across the old 2003 page titled 'A minimal doodler explained', by Richard Suchenwirth. I pasted the code into a script and ran it. It could draw black curves on a white background. Nice. However, an 'artistically challenged' person like myself could use some help in sketching --- like an image to use as a guide in sketching. I had recently posted a script at wiki.tcl.tk that loads GIF/PNG images from an image file to a canvas --- at the page titled 'GUI for Editing Photo-images with Functions'. I figured that, based on that code, I should be able to make a nice sketcher utility that could be used to make some non-trivial sketches. Some of the goals that I had for this utility were: 1) I should be able to remove the image from the canvas at any time so that I could check on the progress of the sketch. Then I should be able to quickly re-apply the image to the canvas. 2) I should be able to specify any color for the lines being sketched --- and any color for the background (the canvas). 3) I should be able to change to a different line width at any time as I laid down the line segments. 4) And, perhaps most importantly, since it is difficult to get line segments just the way you want them (the first time, every time), I needed a 'robust' delete capability that allowed me to quickly delete a line segment and re-draw it. (In Suchenwirth's 'minimal doodler' example, it could delete ALL the lines drawn, but not individual line segments.) --- After a couple of long days of coding --- and reviewing and referring to Chapter 37 'The Canvas Widget' in the 4th edition of the book 'Practical Programming in Tcl and Tk', I came up with the GUI indicated by the following image. |
|
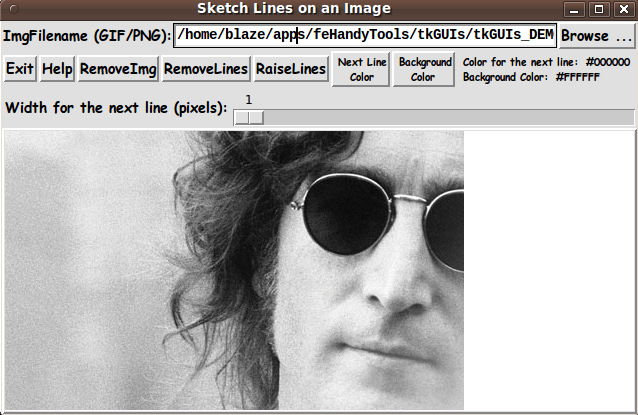
The GUI actually has a blank canvas when it is first started up. This image demonstrates that one can load a nice image onto the canvas. And the following image shows how the GUI may look after sketching some lines on the image. |
|
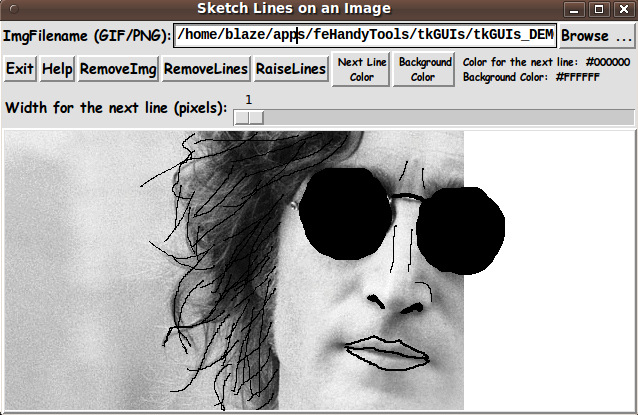
Note that if you are having a hard time seeing the lines that you are drawing on the image, you could start with a 'faded' image. For example, you could take your GIF/PNG image file into an image editor (like 'mtpaint' on Linux). I use the 'Effects > Transform color ...' option in 'mtpaint' to access a slider bar for 'Gamma correction'. By simply sliding that bar from 100 to about 200, I can save to a paler image, and then use that image on which to sketch. The following image shows how the image can be removed with the 'RemoveImg' button, to reveal the progress on the sketch. |
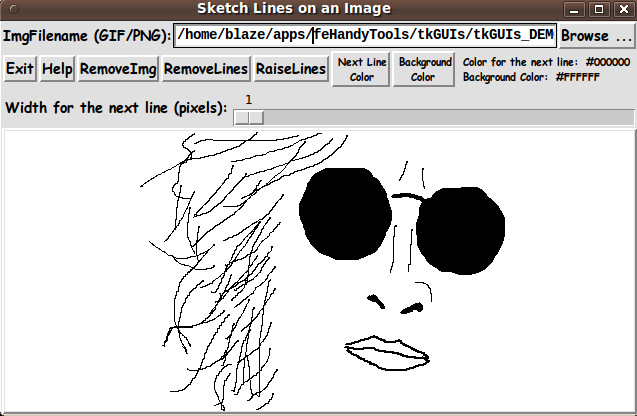
|
The 'Help' button of the GUI shows text like the following, which indicates how one can re-apply the image to the GUI, to continue drawing. And the help indicates how one can quickly delete line segments and quickly relocate the image on the canvas. |
 To DRAW:
 Press MB1 (mouse button 1) to start a line where the arrow-cursor
 is currently located on the canvas. Continue to hold MB1 down and
 move the mouse to draw the current line segment on the canvas.
 Release MB1 to terminate drawing that line segment.

 To DELETE a line segment, press-and-release MB3 (mouse button 3)
 on the line segment to be deleted.

 Click the 'RemoveImage' button to see how your drawing is
 progressing. Then ...

 Click and release MB1 on the filename in the entry field, to
 RELOAD the image from the image file to the canvas. If the
 reload covers up your lines, click on the 'RaiseLines' button
 to reveal the lines again.

 Use MB2 to move (drag) the image to a new location. This can
 be useful to use additional images to help sketch the picture.
 Or it can be used to offset the current image and use it for
 addtional sketching.

 You can use a screen/image capture utility to capture your
 drawing --- with or without an underlying image in place.
|
How to change colors is not mentioned in this help, but it should be fairly obvious that those capabilities are available (and how to make the color changes) from the presense of the 'Next line color' and 'Background color' buttons on the GUI. Those 2 color buttons call on a color-selector-GUI script to set those colors. You can make that color-selector script by cutting-and-pasting the code from the page that offers a non-obfuscated color selector GUI on the freedomenv.com site. There are comments at the top of the code, in a section titled 'USING THE GENERATED IMAGE', that describe how one could capture and make use of images produced by this GUI. DESCRIPTION OF THE CODE I follow my usual 'canonical' structure for Tk code, for this Tk script: |
  0) Set general window & widget parms (win-name, win-position,
     win-color-scheme, fonts, widget-geometry-parms, win-size-control).

  1a) Define ALL frames (and sub-frames, if any).
  1b) Pack   ALL frames and sub-frames.

  2) Define & pack all widgets in the frames, frame by frame.

  3) Define keyboard or mouse 'event' BINDINGS, if needed.

  4) Define PROCS, if needed.

  5) Additional GUI initialization (typically with one or more of
     the procs), if needed.
|
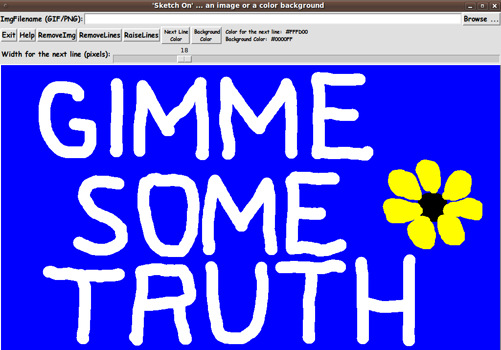
This Tk coding structure is discussed in more detail on the page A Canonical Structure for Tk Code --- and variations. This structure makes it easy for me to find code sections --- while generating and testing a Tk script, and when looking for code snippets to include in other scripts (code re-use). Experimenting with the GUI As in all my scripts that use the 'pack' geometry manager (which is all of my 100-plus Tk scripts, so far), I provide the four main pack parameters --- '-side', '-anchor', '-fill', and '-expand' --- on all the 'pack' commands for the frames and widgets. I think I have found a good setting of the '-side', '-anchor', '-fill', and '-expand' parameters on the 'pack' commands for the various widgets of this GUI. In particular ... The 'canvas' widget expands/contracts appropriately when the window size is changed --- and button and label widgets stay fixed in size and relative-location as the window size is changed. If anyone wants to change the way the GUI configures itself as the main window size is changed, they can experiment with the '-side', '-anchor', '-fill', and '-expand' parameters on the 'pack' commands for the various widgets --- to get the widget behavior that they want. --- In addition, you might want to change the fonts used for the various GUI widgets. For example, you could change '-weight' from 'bold' to 'normal' --- or '-slant' from 'roman' to 'italic'. Or change font families. In fact, you may NEED to change the font families, because the families I used may not be available on your computer --- and the default font that the 'wish' interpreter chooses may not be very pleasing. I use variables to set geometry parameters of widgets --- parameters such as border-widths and padding. And I have included the '-relief' parameter on the definitions of frames and widgets. Feel free to experiment with those 'appearance' parameters as well. Features of the code That said, here's the code --- with plenty of comments to describe what most of the code-sections are doing. I modified the 'doodle' procs of Suchenwirth quite a bit --- and devised a 'doodle_delete' proc to help assure that the desired object is deleted on an MB3 click-and-release. See the PROCS section of the code for an overview of the procs and for the details of their internals. The copious comments in the code might help Tcl-Tk coding 'newbies' get started in making GUI's like this. Without the comments --- especially in the 'doodle_delete' proc, the code might look too cryptic. Potential young Tcler's might be tempted to return to their iPhones and iPads and iPods --- to listen to recently released music --- which IMHO, for the most part, cannot match the music of the late 1960's and early 1970's. The CODE Here is a link to CODE for the script 'sketch_onImgFromFile.tk'. MORE EXAMPLES Here is an image that shows that you do not have to use an image to do your sketching. You can simply sketch on the canvas without using the 'Browse...' button to locate an image file. |
|
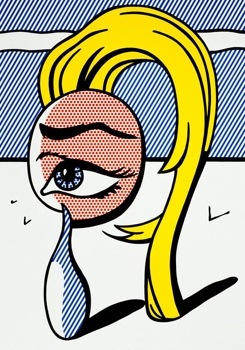
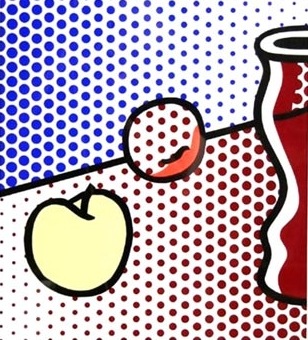
In this case, I used the 'Background color' button to set the canvas background to blue. And I used the 'Next line color' button to, at various times, set the line-color to white, black, and yellow. I also used the 'Width of next line' scale-widget to set several different line widths. --- In summary, I think Tcler's (or their kids) can have some fun times with this 'Sketch On' utility. And those with good artistic capabilities and/or lots of patience can generate some stunning images. 2012oct21 UPDATE: To give potential users of this 'Sketch On' utility some ideas on how it could be used (the range of its capabilities), I decided to post some images here that might trigger some ideas on how to make use of 'SketchOn'. I thought some images of Roy Lichtenstein artwork (the use of dots to creat shading in drawings) would be a good example --- like the following images.
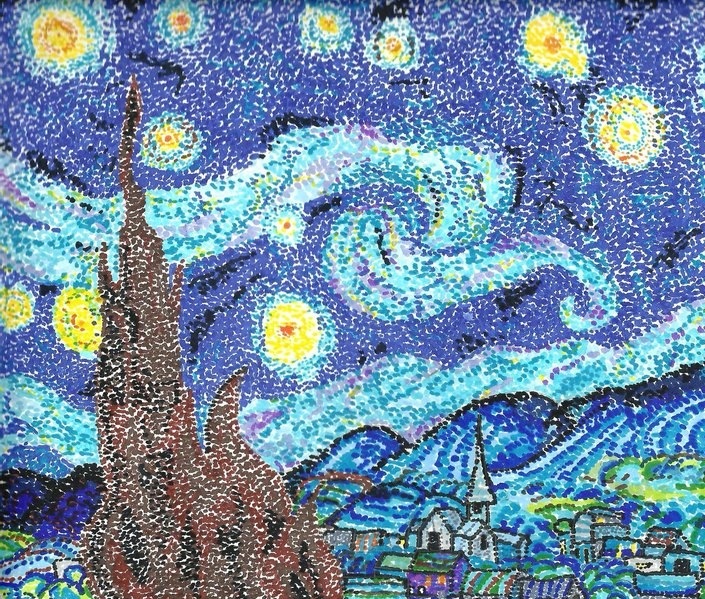
But I realized that the first 2 of these images involved drawing very straight lines, and the code for 'SketchOn', as I first released it, was not well suited for drawing precisely straight lines. I realized that I could add a 'milliseconds delay' scale to the GUI --- to spread out the sampling of points that make up the curves or polygons being drawn. So I have enhanced the GUI, and replaced the previous code with new code above. As it stood, the GUI would handle creating 'pointillism' images like the following classic paintings --- or emulations of them. (The first image is someone's 'dot' painting emulation of Van Gogh's 'Starry Night' painting, which was originally rendered in short 'dashes' of paint.) |
|
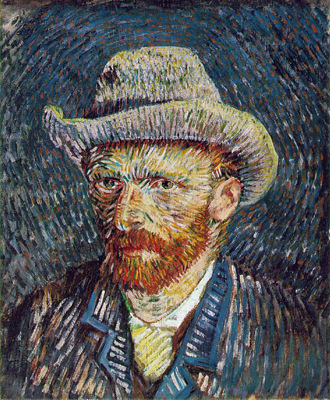
Here is an image of the new 'SketchOn' GUI, with an image that I spend about 10 minutes sketching out, based on the Van Gogh self-portrait above. This is just to give an example of how one could attempt a 'pointillism' type sketch. |
|
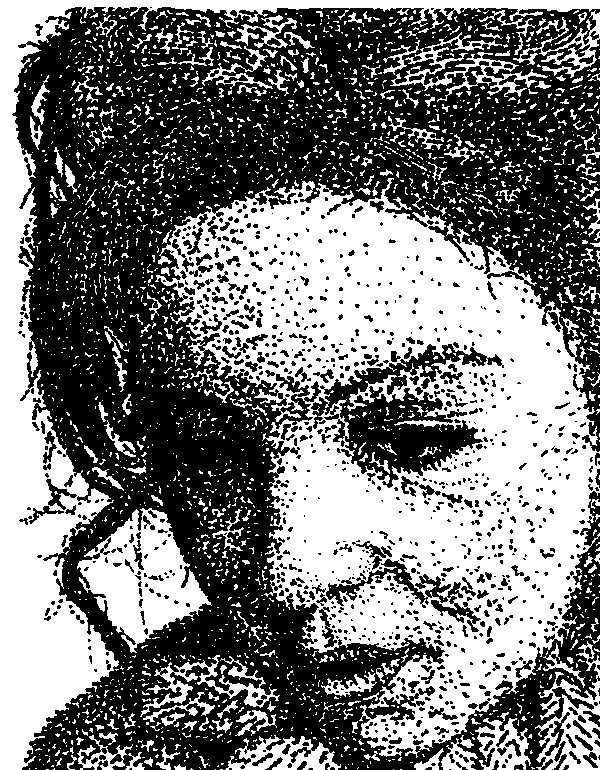
Besides color drawings, one could simply use black and white dots to make drawings --- like the following --- which was not done with 'SketchOn' --- but with a lot of patience and some artistic talent, a person could create drawings like this, with 'SketchOn'. |
|
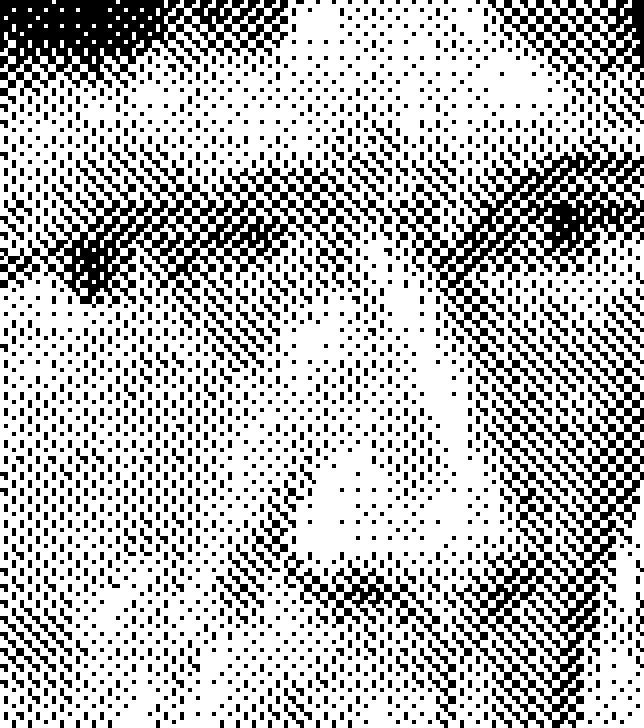
You can make dots ('degenerate lines' = points) with 'SketchOn' by simply releasing mouse-button-1 (MB1) immediately after clicking down with MB1. In fact, by using lots of closely packed dots, one can get drawings that look like they include a gray-scale. Here is an example. It looks like the dots across the nose of this cub are on a gray background. |
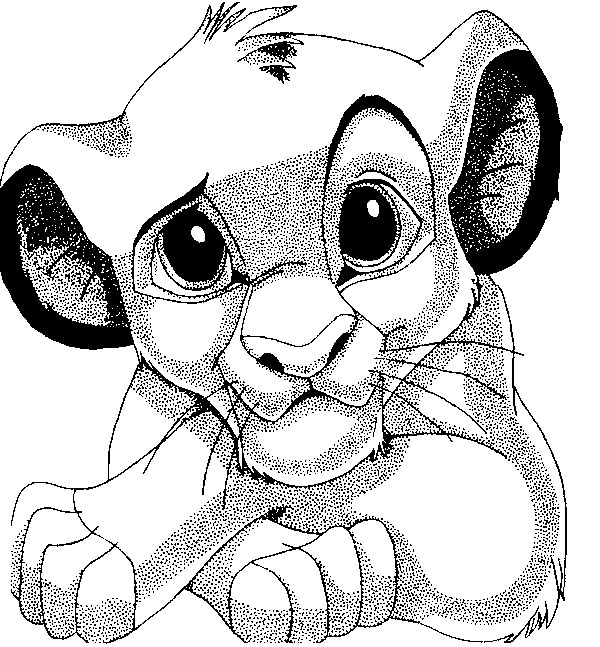
|
However, on taking this image into the 'mtpaint' image editor on Linux, and going into 800% zoom mode, you can see that the dots across the nose are pure black and white --- no gray. |
|
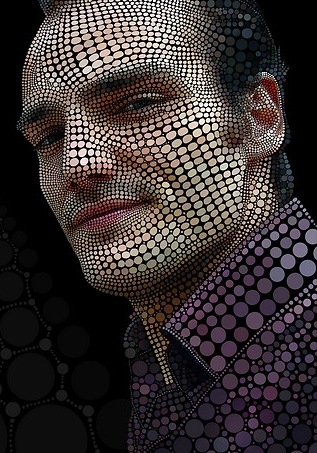
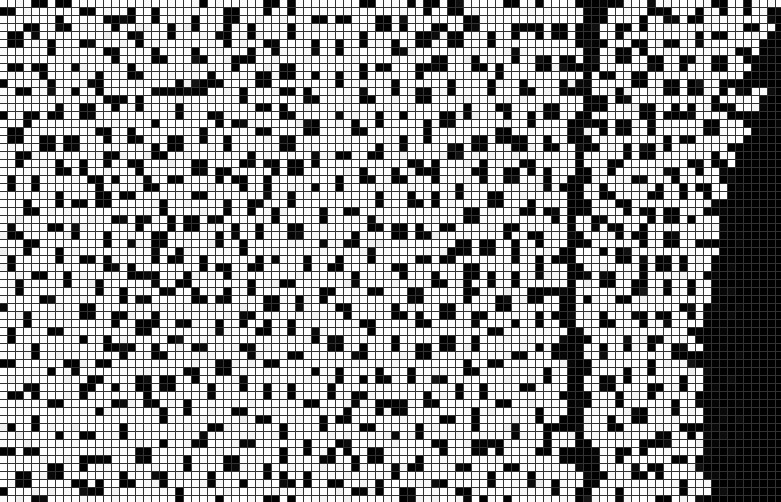
Similarly, newspapers use 'half-tone' procedure to get shaded images of photos, like the following image.
If you scale up this image about 4 times (like the following image), you will see that the image is made up of pure black 'objects' --- some that are L-shapes and staircase-shapes --- on a pure white background. |
|
There is no zoom option in 'SketchOn' by which you could create such micro-detailed shapes --- but you can see that by using a variety of 'line widths', you can make points/dots of various sizes and thus get a halftone-like drawing from 'SketchOn'. In fact, you could use COLORED dots, in a variety of sizes, to get images like the following.
Futhermore, you could use various dashed-line and hatched-line techniques --- like techniques that engravers use --- to get shaded image drawings --- such as the following.
In the Abraham Lincoln image above, take note of the techniques used to render the eyes, lips, and beard --- dashed-parallel-lines, with various lengths and spacings in the dashes. And hatching used to render heavily shadowed areas.
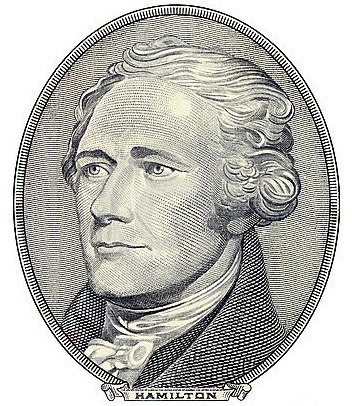
The Alexander Hamilton image above suggests that one could start with a gray background instead of white --- and achieve high-lights, like the one on his forehead, by putting a blob of white in those spots. |
|
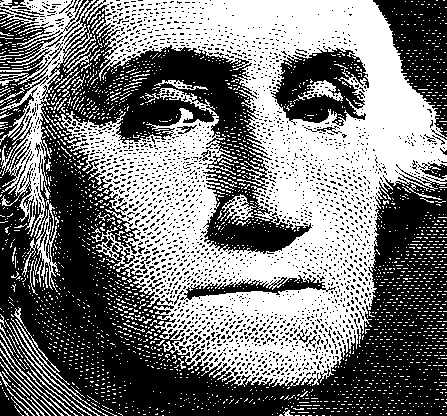
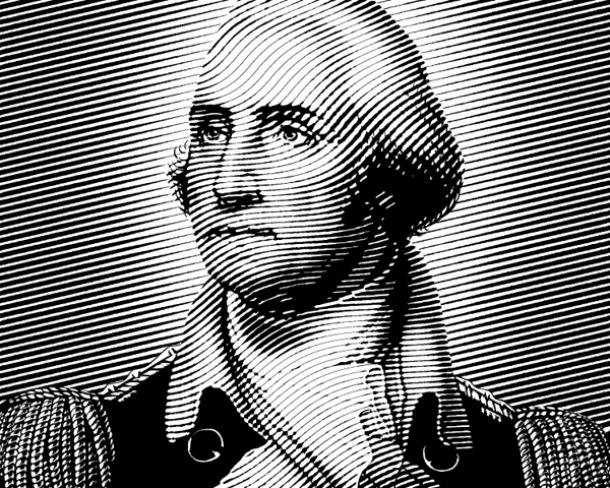
The George Washington image above gives some more ideas on how to render hair and lips. |
|
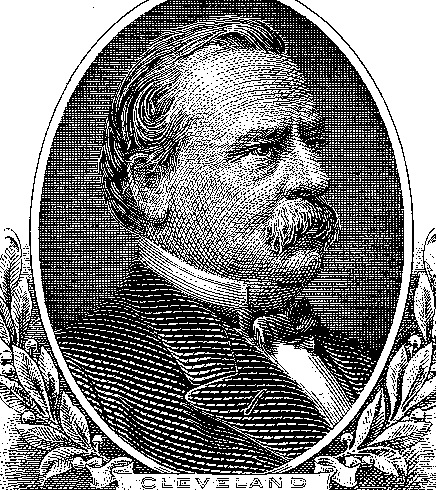
The Grover Cleveland image above is a good example of rendering moustache, hair, and coat. |
|
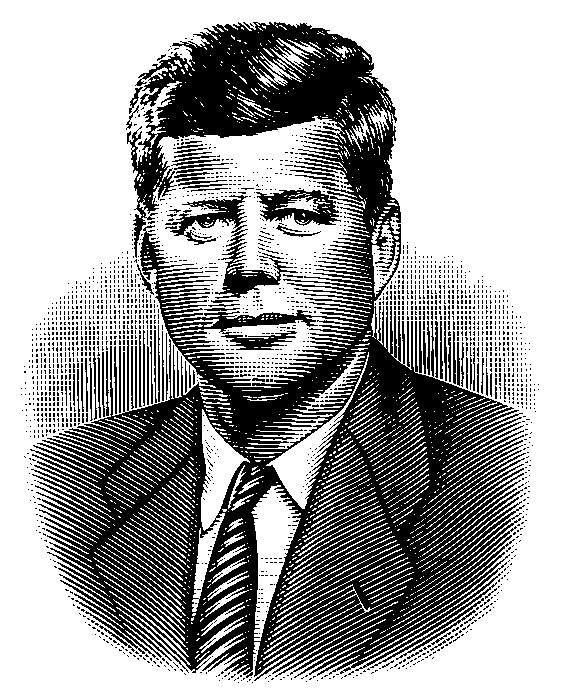
The John Kennedy image above shows that one can get shading across a face by using parallel lines of various widths (no dashes involved). And dot and grid patterns can be used effectively in some places. Note that applying/leaving white in areas like the forehead, over the eyebrows, under the eyes, on the bridge of the nose, between nose and upper lip, and between lower lip and chin --- one can get very effective sense of facial-shape along with lighting effects. |

|
The Ulysses Grant image above shows another example of how one might be able to get the hair effect --- with very thin white and black lines --- either white on black or black applied to white. And this image shows how you could render a wart. No doubt 'SketchOn' could do warts and all. The following image suggests that you could draw ovals or circles on top of a photograph and leave the photograph in place --- to get a quite interesting effect.
Of course, there are definite limits to what can be done with 'SketchOn'. It is not suited for making CAD-like drawings like the following. |
|
On the other hand, there are still enhancements that could be made. |
|
The George Washington image above is done with lines with pinched ends. This is an effect that 'SketchOn' cannot currently do. But it is conceivable that the proc that adds line segments to a line being drawn could be enhanced to be sensitive to the time at each point in the drawing of a line. The line width could be automatically changed according to the speed at which the user is drawing the line --- thicker at slow speeds and thinner at high speeds. Then a line could be tapered at the end whenever the user speeds up the drawing stroke as the user approaches the time to release the mouse button. In any case, hopefully, you can see from the images above (other than the last 2 images) that there is a wealth of drawing types that you can make by using this rather simple 'SketchOn' Tk script --- 'simple' compared to commercial drawing software like Adobe Freehand and the like --- simple and free. One thing definitely on my to-do list for this utility: Add a couple of radiobuttons (or a single checkbutton) to allow the user to specify whether straight or curved lines are to be drawn. |
|
Bottom of this page for To return to a previously visited web page location, click on the Back button of your web browser a sufficient number of times. OR, use the History-list option of your web browser. OR ...
< Go to Top of Page, above. >
|