FE 'tkGooie' Utilities
'IMAGEtools' group
'Merge 2 Images'
tool
(FE = Freedom Environment)

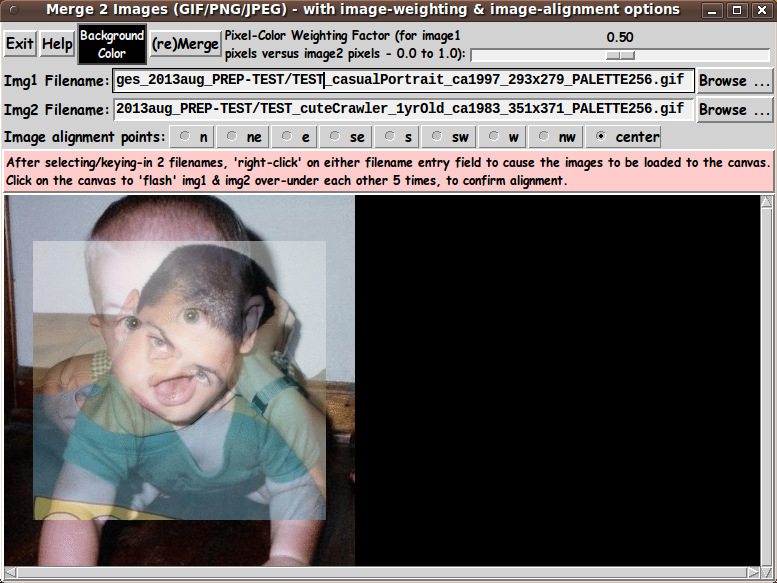
The FE 'Merge 2 Images' 'tkGooie' interface.
It reads the two images from
user-specified GIF or PNG files.
FE 'tkGooie' Utilities'IMAGEtools' group
'Merge 2 Images'
|
The FE 'Merge 2 Images' 'tkGooie' interface. It reads the two images from user-specified GIF or PNG files. |
FE Home Page >
FE Downloads Page >
FE 'tkGooies' Description Page >
FE 'tkGooies' 'IMAGEtools' Page >
This 'Merge-Two-Images' tkGooie IMAGEtool Page
|
INTRODUCTION to 'merge2images' In 2003, 'ulis' provided Tcl-Tk code on a wiki.tcl.tk page titled 'Merging images with transparency'. I thought I might find it handy to have a utility that merges two images --- images in JPEG and PNG files, as well as GIF files. However, in his 'demo' code, 'ulis' did not offer a file selector GUI. The names of two test GIF files were hard-coded in the code. Although he allowed for the two images to be of different sizes, the code reveals that the two images are merged by 'aligning' the 2 rectangular images with their top-left corners matched-up. In other words, there is no flexibility in the alignment of the 2 images. Furthermore, the weighting factor for merging the two images was hard-coded. In fact the GUI consisted only of a canvas holding the new image --- no buttons, no entry fields, no controls of any kind on the GUI. I had a 'merge-two-images' Tk script (with GUI control widgets) on my 'to do' list for about a year (mid-2012 to mid-2013). I started the GUI for that script in August 2013. I set the script aside as I worked on other Tk scripts. I returned to the script about 7 months later (2014 March) and started-and-finished the coding-and-testing of the procs for the script in several days --- and that code is presented below. --- THE GOALS My main goals for the Tcl-Tk script were:
I am currently not concerned with handling transparency in GIF and PNG images. So, in the code below, I have not included code to handle transparency information in either image file. SCREENSHOT OF THE GUI On the basis of the goals above, which implied the need for widgets on the GUI to
I ended up with the GUI seen in the following image. |

|
Note that there are nine 'compass-point' radiobuttons that allow the user to quickly specify a method-of-alignment. And there is a 'scale' widget on the GUI to easily set the weighting factor. --- TYPICAL SEQUENCE OF OPERATIONS WITH THE GUI STEP 1: Select the 2 image files to be merged. This is most conveniently done with the 'Browse...' buttons on the GUI. STEP 2: With the 'alignment' radiobuttons on the GUI, select a 'compass point' which will be used to align the 2 images with respect to each other. (If the 2 images are the same size, any of the choices should yield the same result.) STEP 3: As indicated in a brief 'guide' on the GUI, the user can 'right-click' (with mouse-button-3) on EITHER filename entry field to cause the 2 image files to be read and their images shown on the 'canvas'. The images will be located on the canvas according to the user-selected 'alignment' option. (The 2nd image may completely cover the first, so to be able to check the alignment of the 2 images, the user can CLICK ANYWHERE ON THE CANVAS to cause the 2 images to 'flash' over-under each other several times. Thus the user can see the 'common merge rectangle' of each image --- whose pixels will be averaged together to get the merged image.) STEP 4: Adjust the setting of the 'weight' slider and click on the 'Merge' button to cause the merge (which occurs in about one second). Experiment with the 'weight' slider and the 'Merge' button to see the effect of weighting image1 more or less relative to image2. --- In the sample image above, the second image was bigger (both horizontally and vertically) than the first image. Although the user can see the 'image1' when it is loaded to the canvas --- because there is a pause of about 1 second before loading 'image2' --- the 2nd image, in this case, then completely hides the first. In this case, the 'flash' feature was handy to be able to confirm the alignment of the two images, according to the 'center' radiobutton. After clicking on the 'Merge' button, within about 1 second, one gets a merged image, like the following. |
|
One way to see the 1st image (if it is covered by the 2nd image) --- besides using the 'flash' feature --- is to set the weighting factor to 1.0 and click on the 'Merge' button --- to get an image like the following. |

|
In fact, by setting the weighting factor to 0.0 and clicking 'Merge' the 2nd image is shown without any contribution from the 1st image. --- USING THE MERGED IMAGE: To keep the GUI relatively simple, there is no 'SaveAs-GIF/PNG/JPEG' button on the GUI --- as seen in the images above. A SCREEN/WINDOW CAPTURE UTILITY (like 'gnome-screenshot' on Linux) can be used to capture the GUI image in a PNG file, say. If necessary, an image editor (like 'mtpaint' on Linux) can be used to crop the window-capture image. The image could also be down-sized --- say, to make a smaller image suitable for a web page or an email. And the image could be converted from PNG to GIF or JPEG --- for example, by using the ImageMagick 'convert' command. The image file could be used with a utility (like the ImageMagick 'convert' command or the 'mtpaint' image editor) to change a color of the image to TRANSPARENT. Thus one could make a (partially) transparent GIF or PNG file. MAKING ANIMATED GIF's: Note that given 2 images, one could make a sequence of images which could be used to make an animated GIF. For example: In addition to the 2 original images, one could make 3 more images --- using weighting factors 0.25, 0.50, and 0.75. Then --- after appropriate image capture, image editing, and image conversion --- the 5 images could be combined to make an animated GIF --- using a program like ImageMagick 'convert'. Example command: |
convert -delay 250 -loop 0 file1 file2 file3 file4 file5 output_ani.gif
|
where the delay time of 250 is in 100ths of seconds, giving an inter-image wait time of 2.5 seconds. The parameter '-loop 0' indicates that the animated GIF file should be played indefinitely, rather than stopping after a finite number of cycles. DESCRIPTION OF THE CODE Below, I provide the Tk script code for this 'merge-two-images' utility. I follow my usual 'canonical' structure for Tk code for this Tk script: |
  0) Set general window & widget parms (win-name, win-position,
     win-color-scheme, fonts-for-widgets, widget-geometry-parms,
     text-array-for-labels-etc, win-size-control).

  1a) Define ALL frames (and sub-frames, if any).
  1b) Pack   ALL frames and sub-frames.

  2) Define & pack all widgets in the frames, frame by frame.
              Within each frame, define ALL the widgets.
              Then pack the widgets.

  3) Define keyboard and mouse/touchpad/touch-sensitive-screen action
     BINDINGS, if needed.

  4) Define PROCS, if needed.

  5) Additional GUI initialization (typically with one or more of
     the procs), if needed.
|
This Tk coding structure is discussed in more detail on the page A Canonical Structure for Tk Code --- and variations. This structure makes it easy for me to find code sections --- while generating and testing a Tk script, and when looking for code snippets to include in other scripts (code re-use). I call your attention to step-zero. One thing that I started doing in 2013 is use of a text-array for text in labels, buttons, and other widgets in the GUI. This can make it easier for people to internationalize my scripts. I will be using a text-array like this in most of my scripts in the future. EXPERIMENTING WITH THE GUI As in all my scripts that use the 'pack' geometry manager (which is all of my 100-plus scripts, so far), I provide the four main pack parameters --- '-side', '-anchor', '-fill', '-expand' --- on all of the 'pack' commands for the frames and widgets. That helps me when I am initially testing the behavior of a GUI (the various widgets within it) as I resize the main window. I think that I have used a pretty nice choice of the 'pack' parameters. The label and button and radiobutton and scale widgets stay fixed in size and relative-location if the window is re-sized --- while the two filename entry widgets expand/contract horizontally whenever the window is re-sized horizontally. And the canvas expands both horizontally and vertically when the window is resized. For example, if the user clicks on the Maximize button of the window, the window-manager expands the window to screen-size --- and the two entry fields expand to maximum size horizontally, and the canvas expands to maximum size both horizontally and vertically. You can experiment with the '-side', '-anchor', '-fill', and '-expand' parameters on the 'pack' commands for the various frames and widgets --- to get the widget behavior that you want. --- Additional experimentation: You might want to change the fonts used for the various GUI widgets. For example, you could change '-weight' from 'bold' to 'normal' --- or '-slant' from 'roman' to 'italic'. OR change font families. In fact, you may NEED to change the font families, because the families I used may not be available on your computer --- and the default font that the 'wish' interpreter chooses may not be very pleasing. I use variables to set geometry parameters of widgets --- parameters such as border-widths and padding. And I have included the '-relief' parameter on the definitions of frames and widgets. Feel free to experiment with those 'appearance' parameters as well. If you find the gray 'palette' of the GUI is not to your liking, you can change the value of the RGB parameter supplied to the 'tk_setPalette' command near the top of the code. --- Note that the 'BackgroundColor' button on the GUI calls on an RGB-color-selector-GUI script to set the canvas background color. You can make that RGB-color-selector script by cutting-and-pasting the code from the page that offers a non-obfuscated color selector GUI on this site. SOME FEATURES IN THE CODE That said, here's the code --- with plenty of comments to describe what most of the code-sections are doing. You can look at the top of the PROCS section of the code to see a list of the procs used in this script, along with brief descriptions of how they are called and what they do. The main procs are |
   'get_img1_filename'     - called by the 'Browse...' button beside
                             the entry field for the image1 file

   'get_img2_filename'     - called by the 'Browse...' button beside
                             the entry field for the image2 file

   'get_chars_before_last' - called by the 'get_*_filename' procs and
                             the 'checkFile_convertToGIF' proc

  'checkFile_convertToGIF' - called by the 'get_*_filename' procs

   'prep_imgsANDcanvas_forMerge'  - called by button1-release or  on
                                    either of the 2 filename entry fields

   'create_img1_photoID'     - called by the 'prep_imgsANDcanvas_forMerge' proc

   'create_img2_photoID'     - called by the 'prep_imgsANDcanvas_forMerge' proc

   'set_canvas_size'         - called by the 'prep_imgsANDcanvas_forMerge' proc

   'set_anchorPointOnCanvas' - called by the 'prep_imgsANDcanvas_forMerge' proc

   'place_2images_onCanvas'  - called by the 'prep_imgsANDcanvas_forMerge' proc

   'set_merge_area_limits'   - called by the 'prep_imgsANDcanvas_forMerge' proc

   'merge2images'      - called by a click on the '(re)Merge' button (or, someday?,
                         by button1-release on the 'scale' widget) --- to
                         make a new image on the canvas according to the 2 files
                         and the current settings of the scale and radiobuttons.

   'raise-lower_images'     - called by a button1-release binding on the canvas.

   'new_compass_point'      - called by button1-release bindings on the
                              compass-point radiobuttons

   'set_background_color'   - called by the 'BackgroundColor' button.

   'update_color_button'    -  called by proc 'set_background_color' and
                               called in the 'ADDITIONAL-GUI-INITIALIZATION'
                               section at the bottom of this script.

   'popup_msgVarWithScroll' - used to show messages to the user, such as
                              the HELPtext for this utility via the 'Help' button.
|
Modularity of procs One of the trickiest things about this GUI involved finding a way to break up the necessary operations into a 'modular' form in the procs --- so that the groups-of-operations would support the various user-actions that might be needed via the GUI widgets. Comments at the top of the code indicate how I outlined the sequence of operations to be implemented and how I grouped those operations into separate procs. Even if it is necessary to change, somewhat, the way the operation-groups are performed via 'events' on the widgets of the GUI, the 'granularity' of the modular break-down of the operations into procs will probably serve to facilitate a change to the set of operations triggered by any particular widget-event. --- JPEG and PNG (and other non-GIF image formats) Another challenge was to be able to handle JPEG and PNG files as well as GIF files --- without requiring the user to install a '3rd party' Tk-extension to handle reading JPEG files. I settled on using the 'exec' command to issue the ImageMagick 'convert' command. Code fragment in proc 'checkFile_convertToGIF': |
set RETcode [catch {exec convert "$INfilename" -colors 256 "$tempFilename"} CatchMsg]
|
where 'tempFilename' contains a name that ends with '.gif'. In fact, the proc 'checkFile_convertToGIF' includes an 'exec' of the 'file' command to determine if the $INfilename file is a GIF file --- via use of the Tcl 'string match' command. If the file is determined to be a GIF file, then 'convert' is not used. But, for any other file, the file is converted to a GIF file. So this utility will actually merge any of the 100-plus types of image file supported by the ImageMagick 'convert' command --- by converting such files to a new '.gif' file. Reference: http://www.imagemagick.org/script/formats.php So this utility will convert PGM (Portable Gray Map), PPM (Portable Pixel Map), TIFF (Tagged Image File Format), TGA (Targa), XWD (X Window Dump) and other types of image files to '.gif' files --- and do the merge with those GIF files. --- "Flashing" the 2 images Implementation of the 'flash-the-two-images' option (when the user clicks on the canvas) was done by the following two statements in proc 'raise-lower_images': .fRcanvas.can raise TAGimg1 .fRcanvas.can raise TAGimg2 where these statements are separated by an 'after 500' statement, and each is followed by an 'update' statement. --- Handling huge images To be able to scroll huge images, a '-scrollregion' parameter is used to configure the (scrollable) canvas --- in proc 'set_canvas_size'. There are probably other noteworthy 'features' of the code that could and should be mentioned here. But enough for now. It is my hope that the copious comments in the code will help Tcl-Tk coding 'newbies' get started in making GUI's like this. Without the comments, potential young Tcler's might be tempted to return to their iPhones and iPads and iPods --- to watch videos of life with the Kardashians --- leading to wondering what the Kardashian men do for a living. (Well, the 'white' men anyway. Kanye and Lamar seem to have quite lucrative jobs in the music and basketball 'industries'. Are the white Kardashian men on welfare?) The Tcl-Tk CODE Here is a link to CODE for the script 'merge2images.tk'. INSTALLING THE SCRIPT(s): This utility consists of two Tk scripts --- the 'merge2images.tk' Tk script above --- and the 'sho_colorvals_via_sliders3rgb.tk' Tk script called in the 'set_background_color' proc. This 'set of TWO scripts' could be put in a sub-directory of the user's home directory, such as $HOME/apps/tkMerge2Images. Then the user can use his/her desktop system (such as Gnome or KDE) to set up the main Tk script as an icon on the desktop (or in a desktop 'panel'). Then, whenever the user wants to merge 2 images, he/she can click on the icon to startup the 'merge2images' GUI. SOME POSSIBLE ENHANCEMENTS In using this utility over the next year, I may find that I would like to add a few capabilities, such as 1) Add a 'MakeAniGIF' button to make an animated GIF from the 2 images very quickly (in about a second) --- to 'transition' repeatedly, back-and-forth between the two images. The user would be given several options to specify --- such as number-of-frames and wait-time between frames. Another option could be the utility to use to make the animated GIF. For example, either ImageMagick 'convert' or 'gifsicle' could be used to make the animated GIF file. After selecting the 2 image files, if the user chose to go with the defaults, making the animated GIF would be as easy as clicking on the 'MakeAniGIF' button. 2) Allow for handling transparency in either image (for GIF and PNG files). 3) Add another, more-general alignment option --- for example, an option similar to the 'center' option, but allowing the user to specify a 'general' point on each image to match up. IN CONCLUSION As I have said on several other code-donation pages on this FE site ... There's a lot to like about a utility that is 'free freedom' --- that is, no-cost and open-source so that you can modify/enhance/fix it without having to wait for someone else to do it for you (which may be never). A BIG THANK YOU to Ousterhout for starting Tcl-Tk, and a BIG THANK YOU to the Tcl-Tk developers and maintainers who have kept the simply MAH-velous 'wish' interpreter going. 2014mar29 UPDATE In the 'Possible Enhancements' section above, I mentioned that I might add a 'MakeAniGIF' button to the GUI. I have done that by adding a new '.fRanigif' frame to contain the button and associated parameter-prompting widgets --- and by adding a new 'make_aniGIF' proc. I have replaced the original code above with the new code. Here is an image of the GUI with the new 'MakeAniGIF' button. |

|
Note the prompt for 'Nframes' and 'Delay' (in 100ths of a second) --- as well as 2 radiobuttons to allow a choice between using the ImageMagick 'convert' command or the 'gifsicle' program to make the animated GIF. In testing, I continued with an image of the 'cute kid' above, and tried a merge into a 'Mickey' image, yielding the following animated GIF. The processing from the time of clicking on the 'MakeAniGIF' button to the appearance of the GIF running in an ImageMagick 'animate' program window was about 10 seconds on my medium-powered PC. |

|
Some people might expect a kid to grow up to be a hero someday, so I tried merging the 'cute kid' with a 'super-hero' image. |
|
Note that in these two cases, both the 'Mickey' image and the 'super-hero' image were somewhat wider than the 'cute kid' image. (I had shrunk the original 'Mickey' image and the original 'super-hero' image to have the same height as the 'cute kid' image --- to get images of approximately the same size.) I defaulted to the 'center' alignment option --- and the 'make-animated-GIF' process extracted the 'common merge area' of the two images to make the series of 'weighted-merge' images for the animated GIF. --- Of course, you can use same-sized images, but with the alignment options, you don't really have to go to a lot of extra work to make 2 same-sized images. In some cases, however, you might be starting from 2 same-sized images --- such as the two 300x300 images that made the following animated-GIF. |

|
Note that these two coin images were originally in PNG files, but, as described in a 'non-GIF image formats' section above, this utility automatically uses the ImageMagick 'convert' command to make a GIF file from a non-GIF file --- and then performs all processing with the data from the 2 GIF files, including:
--- Here is an animated GIF that gives an example of transitioning between two 'toon' images. |
|
The transition from one image to another is, admittedly, not ideal. To make the transition smoother, we will need a Tcl-Tk 'morphing' utility. That is on my 'to do' list. :-) --- Here is an animated GIF that gives an example of transitioning between a cartoon image and a photograph-like drawing. |
|
Although it took only about a second or two to make a single merged image from the small-to-medium-sized image pairs used above, it took on the order of 10 to 20 seconds to make each of these animated GIF's. --- Underneath the covers (GIF's to PPM's) I was 'blindsided' in testing by the 'too many colors' error from the 'make_aniGIF' proc when it was executing a command like IDimgTEMP write "$TEMPfilename" -format gif to make one of the GIF files to be used in making the animated-GIF file (using ImageMagic 'convert'). I had forgotten that the process of averaging the colors from pixels in two different GIF files, with no more than 256 colors in each, will (generally) result in an image with more than 256 colors. To write a file containing more than 256 colors, I resorted to writing PPM (Portable Pixel Map) files --- since that is a 'write-format' that is 'natively' supported by Tcl-Tk (including version 8.5) and the PPM format will support 256x256x256 RGB colors for each pixel. Then the 'Nframes' PPM files that are created are used to make the animated-GIF file. --- Some timing data for a single merge (of large images) In the process of testing for the new 'MakeAniGIF' button, I also accumulated timing data for the '(re)Merge' button, which makes a single, 'weighted' image from 2 given images. When the 2 images were about 250x250, it took about 1 second to do the merge on my medium-powered PC. For 500x500, as expected, it took about 4 seconds. And for two 1000x1000 images, it took about 16 seconds. For making an animated-GIF from two images about 1000x1000 in size, one can expect the process to complete within about 40 seconds --- if you use only a few frames. If you are running on a current (2014) high-end Intel i7 processor, you can probably halve these estimates. |
|
Bottom of this page for To return to a previously visited web page location, click on the Back button of your web browser a sufficient number of times. OR, use the History-list option of your web browser. OR ...
< Go to Top of Page, above. >Page history: The code was created in 2014 --- and posted 2014 Mar 15 at http://wiki.tcl.tk/39532.
This FE web page was created 2014 May 07 ---
as a backup and alternative to the wiki.tcl.tk page.
NOTE: |