FE 'tkGooie' Utilities

'MATHed' group

Thales' Theorem
on Right Triangles
in a SemiCircle

(FE = Freedom Environment)

'tkGooie' interface to help
show the proof of Thales'
theorem on triangles
inscribed in a semi-circle.
They must be 'right'.

Large, hi-res images are below.

FE Home Page > FE Downloads Page >

FE 'tkGooies' Description Page >

FE 'tkGooies' 'MATHtools' Menu >

FE 'tkGooies' 'MATHed' Menu >

This Thales' Theorem tkGooie MATHed Page

INTRODUCTION to
Tcl-Tk code for demonstrating
'Thales Theorem on Right Triangles in a SemiCircle'

I am interested in providing Tk GUI's that demonstrate various mathematical 'truths' in an animated and/or interactive fashion.

On the FE (Freedom Environment) 'tkGooies' page for the category 'Tk Scripts for MATHed', I have a list of about 30-plus math demos (geometry, number theory, sequences-and-series, etc.) that I would eventually like to complete (in my old age).

On this page, I present the first of my 'geometry-fact demos' --- and in the process I have devised a set of 'draw' procs that will help me do drawings in 'world coordinates' --- and handle the conversion to pixels, on a Tk canvas, 'in the background'.

    (See the 'Some Features of the Code' section below for some explanation of this 'pixel-calcs' technique.)

I have chosen as a first 'geometry demo' a classic geometry theorem attributed to Thales (see this Wikipedia link), circa 550 B.C.

This theorem is often cited as one of the first known 'generalized' proofs in plane geometry.

Thales is believed to have been a giant on whose shoulders Pythagoras, Euclid, and Archimedes stood.


Goals of the GUI

In this Tk script, I wanted to demonstrate the Thales'_Theorem (see this Wikipedia link) that says:

    The triangles inscribed in a semi-circle are all RIGHT triangles --- when one side of the triangles is coincident with the flat, diametral side of the semi-circle.

I wanted the GUI to use a Tk 'canvas' widget to show the semi-circle and a triangle inscribed within it.

A 'scale' widget on the GUI may be used to allow the user to easily sweep through a family of triangles inscribed in the semi-circle.

In this implementation, I decided to display the diametral side of the semi-circle on the flat bottom side of a semi-circle

--- and the 'peak point' of the triangle(s) is to move along the arc of the semi-circle while the other two vertices of the triangle stay fixed at the ends of the diametral side (line-segment) of the semi-circle.

An additional goal of this GUI is to allow the canvas (and the geometry drawn within the canvas) to be easily resized if the GUI window is resized by the user.

---

Additional items to display on the GUI

Various numeric properties of the triangle could be displayed as the 'peak point' is moved along the circumference of the semi-circle.

I decided to show the circumference of the triangle (sum of the lengths of the 3 sides) and the area of the triangle --- in a couple of 'label' widgets on the GUI.


Some Images of the GUI

Below are a couple of images of the GUI that I ended up with.

The first image shows the GUI as it first appears when the script is invoked.

And below is an image after:

  1. changing the 'draw' and 'background' colors of the canvas items and the canvas,

  2. resizing the window to a smaller size than the initial size, and

  3. sliding the 'slider' of the 'scale' widget to a different setting from the initial setting.

Note that there are 2 color buttons across the top of the GUI for assigning a color to canvas background and to the items drawn on the canvas.

Also note that there is a 'scale' widget on the GUI that allows the user to easily move the 'peak point' of the triangle(s) from one side of the semi-circle to the other.

The size of the semi-circle and triangle can be changed by resizing the window and clicking on the 'Redraw' button.

The new size of the canvas widget is used to determine the new location and size of the semi-circle.

    (The jaggies on the straight lines and the semi-circle arc MAY be nearly invisible if you try this script on a 'retina display', with monitor resolution on the order of 2000x1500 pixels --- more than 150 pixels per inch.)

---

Note that the color buttons call on a color-selector-GUI script to set those colors.

You can make that color-selector Tk script by cutting-and-pasting the code from the page titled

A non-obfuscated RGB color selector GUI

on this site.


DESCRIPTION OF THE CODE

Below is 'local link' to the code that produced this GUI.

There are comments at the top of the code, in a section titled 'CAPTURING THE GUI IMAGE', that describe how one can 'capture' images produced by this GUI.

I follow my usual 'canonical' structure for Tk code, for this Tk script:


  0) Set general window & widget parms (win-name, win-position,
     win-color-scheme, fonts, widget-geometry-parms, win-size-control,
     text-array-for-labels-etc).

  1a) Define ALL frames (and sub-frames, if any).
  1b) Pack   ALL frames and sub-frames.

  2) Define & pack all widgets in the frames, frame by frame.
              Within each frame, define ALL the widgets.
              Then pack the widgets.

  3) Define keyboard and mouse/touchpad/touch-sensitive-screen 'event'
     BINDINGS, if needed.

  4) Define PROCS, if needed.

  5) Additional GUI initialization (typically with one or more of
     the procs), if needed.


This Tk coding structure is discussed in more detail on the page A Canonical Structure for Tk Code --- and variations.

This structure makes it easy for me to find code sections --- while generating and testing a Tk script, and when looking for code snippets to include in other scripts (code re-use).

I call your attention to step-zero.

One new thing that I have started doing recently is using a text-array variable --- named 'aRtext' --- for text in labels, buttons, and other widgets in the GUI.

This can make it easier for people to internationalize my scripts.

I will be using a text-array like this in most of my scripts in the future.


Experimenting with the GUI

As in all my scripts that use the 'pack' geometry manager (which is all of my 100-plus Tk scripts, so far), I provide the four main 'pack' parameters

  • '-side'
  • '-anchor'
  • '-fill'
  • '-expand'

on all the 'pack' commands for the frames and widgets.

That helps me when I am initially testing the behavior of a GUI (the various widgets within it) as I resize the main window.

I think I have found a good setting of the '-side', '-anchor', '-fill', and '-expand' parameters on the 'pack' commands for the various widgets of this GUI.

In particular ...

The 'canvas' widget expands/contracts appropriately when the window size is re-sized --- and button and label widgets stay fixed in size and relative-location as the window size is re-sized.

If anyone wants to change the way the GUI configures itself as the main window size is changed, they can experiment with the '-side', '-anchor', '-fill', and '-expand' parameters on the 'pack' commands for the various widgets --- to get the widget behavior that they want.

    Note:
    I have found that one can get some quite surprising self-changing movement of the slider-button on scale widgets if you allow a scale widget to expand as the window is re-sized.

    So you may want the scale widgets to stay fixed in length ('-fill none') and/or use '-expand 0' when packing scale widgets --- rather than using '-fill x -expand 1' with scale widgets and an expandable GUI window.

---

Additional experimentation with the GUI:

You might want to change the fonts used for the various GUI widgets.

For example, you could change '-weight' from 'bold' to 'normal' --- or '-slant' from 'roman' to 'italic'.

Or change font families.

    In fact, you may NEED to change the font families, because the families I used may not be available on your computer --- and the default font that the 'wish' interpreter chooses may not be very pleasing.

I use variables to set geometry parameters of widgets --- parameters such as border-widths and padding.

And I have included the '-relief' parameter on the definitions of frames and widgets.

Feel free to experiment with those 'appearance' parameters as well.


Some features of the code

There are plenty of comments in the code to describe what most of the code-sections are doing.

The main routine is the 'Redraw' proc.

That proc uses a set of 'draw' procs that allow the coder to work mostly in 'world coordinates' rather than 'pixel coordinates'.

The 'draw' procs have fairly descriptive names:

  • mapping_for_wc2px
  • Xwc2px
  • Ywc2px
  • draw_line_x1y1x2y2
  • draw_arc_x1y1_degStart_degExtent
  • draw_text_x1y1_center
  • draw_point_x1y1_radiusPx

where 'wc' stands for 'world coordinate(s)' and 'px' stands for 'pixel(s)'.

The input to all of these procs except the first one are 'world coordinates' rather than 'pixel coordinates'.

And the only pixel coordinates input to the 'mapping_for_wc2px' proc are the pixel coordinates of the upper-left and lower-right corners of a rectangle on the canvas.

Those two corner points are usually taken to be the corners of the canvas --- (0,0) and
(canvasWidthPx,canvasHeightPx).

You can see the comments in the 'Redraw' proc for details on how the 'draw' procs are used to make the image on the canvas.

A few other procs are:
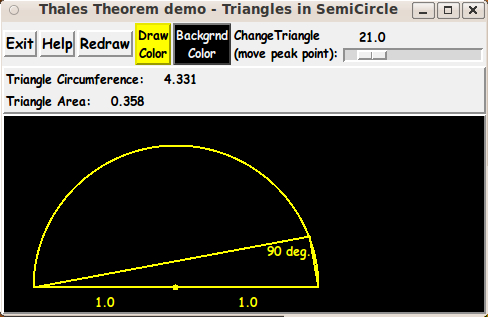
  • set_draw_color ---
    for the 'DrawColor' button

  • set_background_color ---
    for the 'BackgroundColor' button

  • update_button_colors ---
    called by the 'set_*_color' procs

  • popup_msgVarWithScroll ---
    called by the 'Help' button


Comments in the Code

It is my hope that the copious comments in the code will help Tcl-Tk coding 'newbies' get started in making GUI's like this.

Without the comments --- especially in the 'Redraw' proc and the various 'draw' procs --- the code would look like 'too much monkey business to be involved in', to quote Chuck Berry.

Without the comments, potential young Tcler's might be tempted to return to their iPhones and iPads and iPods --- to watch videos of 'news people' on various TV channels all repeating the same phrases that someone has provided to all of them.


The Tcl-Tk CODE

Here is a link to CODE for the script

'thalesTheorem_rightTriangles_inSemiCircle.tk'.


SOME POSSIBLE ENHANCEMENTS:

When I first published this script, it was missing some features (following) that I wanted to eventually provide.

    (I eventually provided most of those features.
    See the '2014apr29 UPDATE' section below.)

  1. Describe Thales' proof

    Some extra lines and text could be drawn on the canvas to indicate Thales' proof of the fact (the theorem) --- that the 'peak angle' is always a 'right angle'.

    A 'ShowProof' checkbutton could be added to the GUI.

    When the checkbutton is checked, lines would be drawn (some dashed) and text would be shown that explain the proof.

    When the checkbutton is un-checked, the lines and text would disappear.

    The proof-lines should move as the 'peak point' is moved.

  2. Inner product calculation

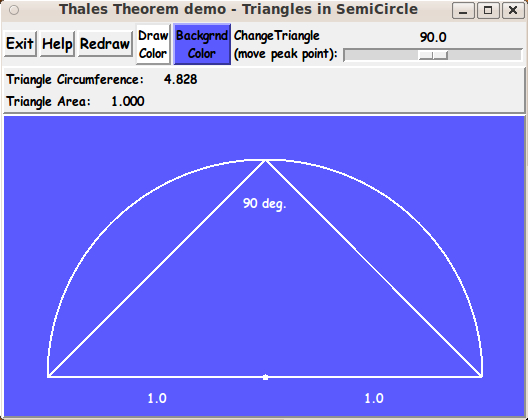
    The GUI shown above simply labels the 'peak angle' with '90 deg.' --- and it does appear that the angle is a right angle.

    However, looks can be deceiving.

    If the user accepts that the 'inner product' of 2 vectors is the product of their magnitudes and the cosine of the angle between them, then the GUI could show that the inner product of the two vectors

    • from (xPeak,yPeak) to (-1.0,0.0)

    • from (xPeak,yPeak) to (+1.0,0.0)

    is always zero, where (xPeak,yPeak) is the 'peak point' of the triangle --- on the arc between (-1.0,0.0) and (+1.0,0.0).

    Then we would be giving more rigorous proof that the 'peak angle' is a right angle.

    If I ever do an update of this script, I may add that feature.

    That would be taking us from about 600 B.C. to the Cartesian analytic geometry and vector analysis of the 19th and 20th centuries.

  3. More numeric properties

    Besides the circumference of the triangle (sum of the lengths of the 3 sides) and the area of the triangle, various other numeric properties of the triangle could be displayed as the 'peak point' is moved along the circumference of the semi-circle.

    For example:
    the other 2 angles of the triangle (in degrees or radians).

  4. Draw additional geometric elements

    Various geometric properties/elements of the triangle could be displayed on the canvas.

    For example, the 'circumcenter' and/or 'centroid' points of the triangle could be drawn as points inside the triangle.

    The points would move (be erased and re-drawn) as the 'peak point' of the triangle is moved by the user.


IN CONCLUSION:

I would like to give my usual thanks to Ousterhout and the maintainers of the 'wish' interpreter for making all these mathematical and graphical utilities (that I have coded and that are on my 'to-do' list) possible.
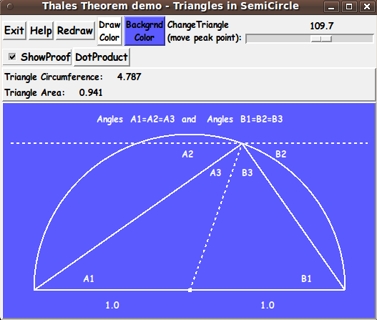
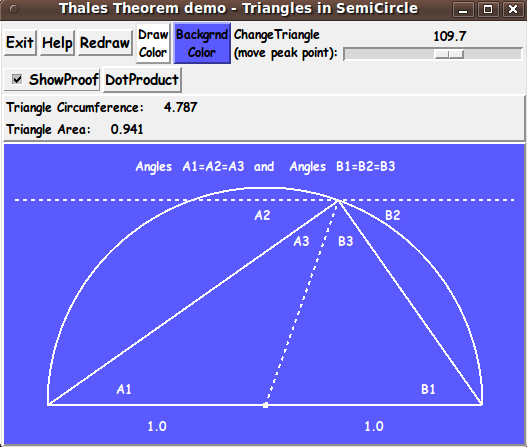

UPDATE 2014apr29

I implemented 'possible enhancement' items 1 and 2 above --- via a 'ShowProof' checkbutton and a 'DotProduct' button added to the GUI.

Below is an image showing the new buttons --- and the 'proof lines and angle-labels' that are added to the canvas to help explain the proof.

When the 'ShowProof' checkbutton is used to show the proof, a text window pops up (in additon to the drawing of the 'proof lines and angle-labels') --- to explain the proof.

And when the 'DotProduct' button is clicked, a text window pops up showing the dot-product calculations for the CURRENT configuration of the triangle on the canvas.

I replaced the code above with the new code.

For several months, I had it on my 'to do' list to add these 'proof items' to this script.

Now I am positioned to use the techniques and procs that I developed for this script in making other geometry-proof scripts.

I have about 50 such proofs on my 'to do' list.

That should keep me busy for the next few years --- along with my 'to do' scripts in many other categories.

Bottom of this page for
presenting Tcl-Tk code for tkGooie
Thales' Theorem on Right Triangles
in a SemiCircle

--- an educational utility
in the FE 'tkGooies' system,
in the 'MATHed' subgroup
of the 'MATHtools' group.

To return to a previously visited web page location, click on the Back button of your web browser a sufficient number of times. OR, use the History-list option of your web browser.
OR ...

< Go to Top of Page, above. >

Page history:

The code was initially created in 2013 --- and posted 2013 Dec 03 at http://wiki.tcl.tk/39010.

This FE web page was created 2014 May 09.
(as a backup and alternative to the wiki.tcl.tk page)

This page was changed 2014 May 16.

Page was changed 2015 Oct 05.
(Small changes.)

Page was changed 2019 Mar 05.
(Added css and javascript to try to handle text-size for smartphones, esp. in portrait orientation.)

Page was changed 2019 Jul 02.
(Specified image widths in percents to size the images according to width of the browser window. Also added some web links.)


NOTE:
The code on this page MAY BECOME more 'up-to-date' than the code posted on the Tcler's Wiki ---
at wiki.tcl-lang.org --- formerly wiki.tcl.tk.