FE 'tkGooie' Utilities

'SYSTEMtools' group

'tkPointerSettings'
to configure mice
and other
pointer devices

(a front-end for the
'xinput' command)

(FE = Freedom Environment)

GUI interface for mapping
the functions of the
buttons on mice or
touchpads or other
'pointer' devices.
---
This GUI is a 'frontend'
for the 'xinput' command.
The GUI presents a list of
button operation options
in the listbox on the left.
The radiobuttons allow you
to RE-MAP button operations.

FE Home Page > FE Downloads Page >

FE 'tkGooies' Description Page >

FE 'tkGooies' 'SYSTEMtools' Menu >

This
'tkPointerSettings'
tkGooie code Page

INTRODUCTION to Tcl-Tk script
'tkPointerSettings'

In 2012-2013, on my 'done-and-to-do' list of Tk scripts, I had a project listed to build a Tk GUI for mapping mouse buttons --- in particular, a Tk-GUI 'wrapper' for the 'xinput' command of the X.org server (on Linux/Unix/BSD systems).

I have addressed that item on my 'to-do' list, and the code and sample image(s) are below.

In the process of creating the GUI (and in the process of re-mapping some buttons on a couple of my computer mice), I found that I needed to implement several variations of the 'xinput' command:

  • xinput list

  • xinput test <deviceID>

  • xinput get-button-mappings <deviceID>

  • xinput set-button-mappings <deviceID> <Map-list>

The GUI controls for re-mapping 'pointer device' functions to the various 'buttons' (or 'protuberances' or 'wires') of the device evolved during the coding and testing, and I ended up with the GUI seen in the following image.

In this image, the labels colored red draw attention to the items that need to be addressed (or used) in re-mapping 'wires' of a 'pointer device'.

And the green label indicates the output from the 'xinput list' command that executes when the GUI is started up.


Some of the typical uses of this GUI are

  • To switch the functions of mouse buttons 1 and 3, for left-handed users.

  • To deactivate the 'paste' function of mouse-button 2 (the scroll wheel) --- for users of a mouse with scroll-wheel --- when pressing down too hard on the scroll-wheel causes an unwanted paste operation.

  • To deactivate the 'scroll' functions of the scroll-wheel --- so that the wheel can be used just for the 'paste' function, without accidentally scrolling a window while doing the paste.

  • To assign buttons 6 and/or 7 (on a scroll-wheel mouse with extra buttons #6 and #7) so that the 'paste' operation can be done with one or either of the additional buttons, instead of with the scroll wheel.

    For a scroll-wheel mouse whose scroll-wheel can be tilted left or right triggering 'buttons' 6 and 7, one might want to assign buttons 8 and/or 9 (other buttons, not the scroll wheel) the 'paste' function.


Built-in Help

The 'Help' button on the GUI provides pretty complete and detailed help for using the GUI.


Here is the main 're-mapping guidance' from the Help:


GUI FEATURES and OPERATION NOTES:

The **DeviceID ENTRY FIELD** is used to specify a device number for the user's pointer device.

The DeviceID can often be determined simply by looking at the **output of the 'xinput list' command**, which is shown in a **SCROLLABLE TEXT** area on the GUI.

Sometimes it is not enough to look for a string like 'Type is MOUSE' or 'Type is TOUCHPAD' in the text area to find the DeviceID number after an 'id=' string.

And sometimes there is not a distinguishing 'device name', like 'USB Optical Mouse' nor a manufacturer name like 'Logitech' followed by a word like 'Mouse'.

In other words, the name of the pointer device may be obfuscated.

Also, if the user plans to assign a function to a button (or other 'protrusion' or 'wire' of the pointer device), it may not be clear what number that 'button' has been assigned.

In those cases, it is helpful to put a GUESS at a DeviceID number in the DeviceID entry field, and click on the ** 'Test' BUTTON **.

Then a window pops up and for any motion of the mouse/pointer-device and for any action, like a button press, text will appear in the 'Test' window to indicate the event.

Button presses, anywhere on the desktop, will show a button number.

Hence you can determine button numbers for 'protuberances' on the pointer device.

Once you determine the DeviceID and have it entered in the DeviceID field, you can press the ** 'GETmap' BUTTON ** and the command

xinput get-button-map <DeviceID>

will be run and the output will show up in the text area to the right of the 'Map-list' label on the GUI.

To change a number in the 'Map-list' string, click on a RADIOBUTTON of the GUI, to choose a position number, from 1 to 24.

Then click on a line of the Functions LISTBOX, to assign that function to the chosen position in the Map-list string. The Map-list should immediately update on the GUI.

For example, a left-handed user might click on RADIOBUTTON 1 and click on 'functionForButton3(menu)' in the LISTBOX. Then they would click on RADIOBUTTON 3 and click on 'functionForButton1(select)' in the LISTBOX.

When the user has set the Map-list string as desired, they click on the ** 'SETmap' BUTTON ** on the GUI, which runs the command

xinput set-button-map <DeviceID> <Map-list>.

The change to the actions of the pointer device should take effect immediately.

The user can test this out by doing 'paste' operations or 'select' operations (or whatever) from/to/in various X-windows of the user's desktop.


DESCRIPTION OF THE CODE

Below, I provide the Tk script code for this 'tkPointerSettings' utility.

I follow my usual 'canonical' structure for Tk code for this Tk script:


  0) Set general window & widget parms (win-name, win-position,
     win-color-scheme, fonts, widget-geometry-parms, win-size-control,
     text-array-for-labels-etc).

  1a) Define ALL frames (and sub-frames, if any).
  1b) Pack   ALL frames and sub-frames.

  2) Define & pack all widgets in the frames, frame by frame.
              Within each frame, define ALL the widgets.
              Then pack the widgets.

  3) Define keyboard and mouse/touchpad/touch-sensitive-screen action
     BINDINGS, if needed.

  4) Define PROCS, if needed.

  5) Additional GUI initialization (typically with one or more of
     the procs), if needed.


This Tk coding structure is discussed in more detail on the page A Canonical Structure for Tk Code --- and variations.

This structure makes it easy for me to find code sections --- while generating and testing a Tk script, and when looking for code snippets to include in other scripts (code re-use).

I call your attention to step-zero.

One new thing that I have started doing in 2013 is using a text-array variable --- named 'aRtext' --- for text in labels, buttons, and other widgets in the GUI.

This can make it easier for people to internationalize my scripts.

I will be using a text-array like this in most of my scripts in the future.


Experimenting with the GUI

As in all my scripts that use the 'pack' geometry manager (which is all of my 100-plus scripts, so far), I provide the four main 'pack' parameters:

  • '-side'
  • '-anchor'
  • '-fill'
  • '-expand'

on all of the 'pack' commands for the frames and widgets.

That helps me when I am initially testing the behavior of a GUI (the various widgets within it) as I resize the main window.

I think that I have used a nice choice of the 'pack' parameters.

In particular ...

The labels and buttons and radiobuttons stay fixed in size and relative-location as the window is re-sized --- while the scrollable listbox widget and scrollable text widget (along with their x and y scrollbars) expand/contract appropriately if the window is re-sized.

    You can experiment with the '-side', '-anchor', '-fill', and '-expand' parameters on the 'pack' commands for the various frames and widgets --- to get the widget behavior that you want.

---

Additional experimentation with the GUI
--- its appearance:

You might want to change the fonts used for the various GUI widgets.

For example, you could change '-weight' from 'bold' to 'normal' --- or '-slant' from 'roman' to 'italic'.

Or change font families.

    In fact, you may NEED to change the font families, because the families I used may not be available on your computer --- and the default font that the 'wish' interpreter chooses may not be very pleasing.

I use variables to set geometry parameters of widgets --- parameters such as border-widths and padding.

And I have included the '-relief' parameter on the definitions of frames and widgets.

Feel free to experiment with those 'appearance' parameters as well.


Some features in the code

There are plenty of comments in the code, to describe what most of the code-sections are doing.

You can look at the top of the PROCS section of the code to see a list of the procs used in this script, along with brief descriptions of how they are called and what they do.

The main procs involve use of the 'xinput' command.

The several xinput-proc names (and the form of the 'xinput' command that is executed) follow --- preceded by the button name that calls on the proc.

---

For the 'SETmap' button, the proc 'xinput_setmap' executes:


   exec /bin/sh -c "/usr/bin/xinput set-button-map $deviceID $NUMSstring"


For the 'GETmap' button, the proc 'xinput_getmap' executes:


   set NUMSstring [exec /usr/bin/xinput get-button-map $deviceID]


For the 'Test' button, the proc 'xinput_test' executes:


   exec xterm -hold -fg white -bg black -e \
      /usr/bin/xinput test $deviceID


The command 'xinput list' is executed within the proc 'init_xinput_parms_array', which is called in the 'Additional GUI Initialization' section at the bottom of the script.

The proc 'rebuild_xinput_parms' is executed whenever a line in the listbox is clicked --- to rebuild the 'Map-list' text string of integers that is shown on the GUI.


Comments in the Code

It is my hope that the copious comments in the code will help Tcl-Tk coding 'newbies' get started in making GUI's like this.

Without the comments, potential young Tcler's might be tempted to return to their iPhones and iPads and iPods --- to watch videos of dogs-gone-wild, chasing their own tails.


The Tcl-Tk script CODE:

Here is a link to CODE for the script

'tkPointerSettings_xinputFrontEnd.tk'.


THE OTHER GUI BUTTONS

I described use of the 'SETmap', 'GETmap', and 'Test' buttons of the GUI above --- and more detail can be seen in the HELPtext variable of the code above.

Of course, the 'Exit' button exits this app and closes the GUI window, and the 'Help' button shows the text of the HELPtext variable in the code above.

But there is another button on the GUI --- the 'ColorMe' button.

The 'ColorMe' button is not essential.

It is there just in case your friends tell you that the GUI looks 'blah'.

You can change the window's 'palette' of colors to a color of their choosing.

See the following example in which the initial default gray color for most of the GUI is changed to blue.

If you want to implement the 'ColorMe' color-selector button, it uses an 'external' Tk color-selector script.

You can make that color-selector script by cutting-and-pasting the code from the page offering

'a non-obfuscated color selector GUI'

on this site.

You could install it in the same directory as this 'tkPointerSettings' Tcl-Tk script.


SOME POTENTIAL ENHANCEMENTS:

I actually do not have any plans for further enhancements for the GUI interface, but I have recently purchased several 'pointer devices' --- both

  • for testing this utility, and

  • for replacing the mice that I use on my main desktop and netbook computers with a mouse by which I can more easily do 'text swipe-and-paste' operations.

The scroll-wheels on my current mice make that nice, Unix-era swipe-and-paste-operation a frustration, as the paste with the middle-button often causes the scroll-wheel to rotate and move the text in an editor window when I did not want to scroll the text.

    I even bought a 'SteelSeries 3GC Controller - USB Rumble PC Controller' --- for only $20 at Walmart.

    This is actually a game controller, but I thought I would try testing out how it would do as a mouse replacement.

If testing goes OK, I may replace the mice on my desktop and netbook computers with a mouse that has additional buttons that I can map to the 'paste' function.

I may update the code posted here if I find I need some enhancements in dealing with these 'pointer devices'.

In any case, I will probably add some commented 'set' statements in the code --- in the 'Additional GUI Initialization' section at the bottom of the script or in the 'init_xinput_parms_array' proc --- for 'suggested' (or default) settings for various models of pointer device.

---

By the way, I have not tested this Tk GUI in mapping functions of a 'touchpad'.

I find touchpads too counter-productive for use in code development, so I never use them.

But if anyone tries using this utility for re-mapping functions of a touchpad, and if they discover any useful information, they could post their experiences on the original copy of this page at the Tcler's Wiki.


IN CONCLUSION

There's a lot to like about a utility that is 'free freedom' --- that is, no-cost and open-source so that you can modify/enhance/fix it without having to wait for someone else to do it for you (which may be never).

I hope to provide more 'user-friendly, useful utilities' --- UUU's --- done with Tk scripts.

    ('useful' and 'utility' may seem redundant, but I think those words are worth repeating.)

As I have said on other code-donation pages on this FE web site (and this also bears repeating) ...

A BIG THANK YOU to Ousterhout for starting Tcl-Tk, and a BIG THANK YOU to the Tcl-Tk developers and maintainers who have kept the simply MAH-velous 'wish' interpreter going.

UPDATE 2013aug25 - info on various mice

I have been using a Logitech M500 mouse for a day now with a couple of button-mapping experiments on a couple of its 'side buttons'.

I have found a 'pretty good' mapping to support the fast text 'swipe-with-MB1-and-paste-with-MB2' that I find so productive.

    Unfortunately, I later found that pressing on the side buttons tended to make the mouse move.

    Not a good thing.

You can see the couple of mappings that I have tried in the 'init_xinput_parms_array' proc in the code above.

I replaced the code above --- with the changes in that proc --- and with some spelling corrections in the 'HELPtext' variable.

I also added some text in the HELPtext variable that explains what I did for the Logitech M500 mouse.

In the following image of the M500, you can see the two buttons on the side of the mouse that I am mapping.


Logitech M500

Here is an extract from that HELPtext:


   ... for those who like a quick swipe-and-paste
   operation with buttons 1 and 2, where 2 is a
   scroll wheel ... :

   Deactivate the scroll up and down functions of
   'buttons' 4 and 5 (so that button 2, the
   scroll wheel, is just used for paste, not scroll)
   --- and re-assign the scroll up and down functions
   of the scroll wheel to side (thumb) buttons
   9 and 8, respectively.

   (This works better for text pasting, because
    we need the thumb to hold the mouse down firmly
    while we do the paste with the index finger
    pressed on the scroll wheel.

    We do not need this precise, held-steady
    positioning of the mouse to do scrolling.

    So it is OK to let up on the mouse with the thumb,
    and use the thumb on buttons 8 and 9 to
    scroll down and up.)


This mapping --- which is '1 2 3 0 0 6 7 5 4 10 11 ...' for righties --- or '3 2 1 0 0 6 7 5 4 10 11 ...' for lefties --- would also work for the Logitech M510, which is the wireless version of the M500.

This is still not an ideal situation for a couple of reasons (that I explain in another UPDATE below).

I may look into using a mouse on which there are one or more extra buttons ON TOP OF the mouse, that I can make a 'paste' button.

The following image shows a 'SteelSeries World of Warcraft' mouse with a couple of buttons on top of the mouse in white circles.


SteelSeries 'World of Warcraft' mouse
(similar to the SteelSeries 'Legendary Editon' mouse)

I may try that mouse and use one of those top buttons for paste --- which would allow me to use the scroll-wheel for scrolling --- instead of the side/thumb buttons that I am using for repeated-button-press scrolling on the Logitech M500.

There are plenty of mice with 'additional top buttons' that I can try, such as the Logitech G500 or G700 gaming mice (images follow).


Logitech G500


Logitech G700

And there are other brands that look like they have 'additional top buttons', such as:


Corsair Vengeance M90


Razer Mamba wireless


Sunsonny SM-SG80


Zalman ZM-M300 wired

And I may try experimenting with the SteelSeries 3GC game controller:


SteelSeries 3GC game controller

What can I make this baby do? Control a robot through my computer --- to open the refrigerator door and bring me a beer?

Or perhaps control my 'PD' from my 'PC' --- my 'Personal Drone' from my 'Personal Computer'.


UPDATE 2013sep09
with info on the Logitech G300 mouse

After using a Logitech M500 mouse for about a week --- with the button mapping that used the scroll-wheel for 'paste' and that moved the scroll up/down functions to the 2 side buttons --- I found that I did not like the feel of the wheel rolling when I did a 'paste' --- and I missed the fast-scroll that I had with the scroll wheel.

The Logitech G300 mouse looked like my best bet for a next attempt --- in a mouse costing less than $40.

I could not find the G300 in local 'box' stores, so I sent off for one.

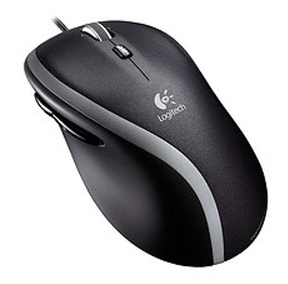
An image showing the top buttons follows.


Logitech G300
(similar to the Logitech G300s)

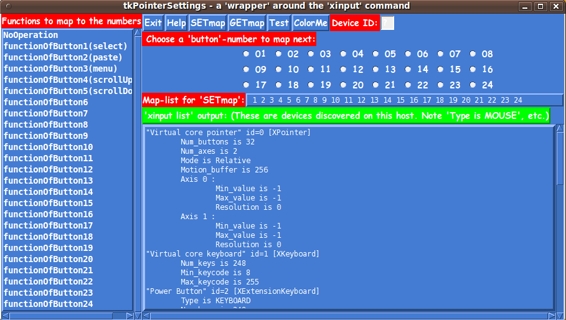
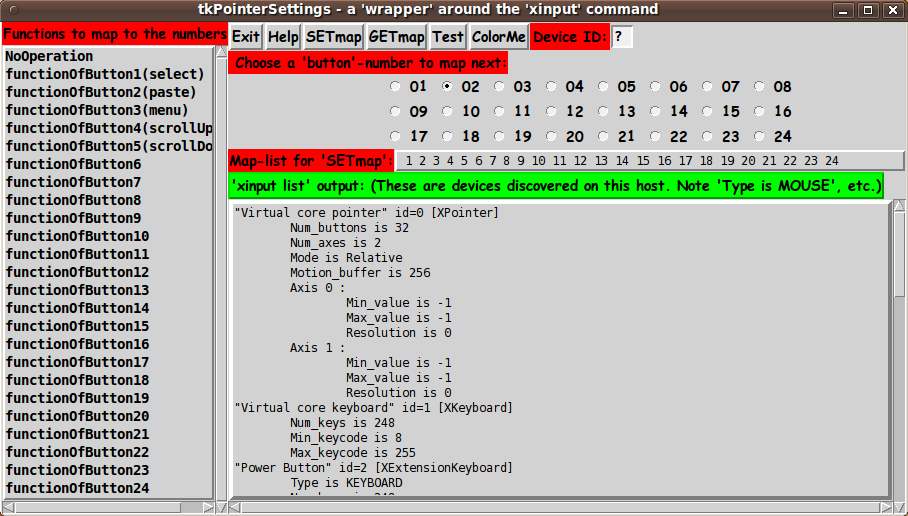
I plugged this mouse into my desktop computer and started up the 'tkPointerSettings' GUI.

It showed this mouse with name "Logitech Gaming Mouse G300" and with id=8.

I put 8 in the 'Device ID:' entry field and clicked the 'Test' button.

In the window that popped up, whenever I clicked on the 2 top-left buttons of the G300, they were revealed to be buttons 8 and 9.

A rather strange thing about this mouse :

When I clicked on the 2 top-right buttons, they did not show as anything in the 'Test' window (no button numbers appeared).

Their functions seem to be 'hard-wired' into the mouse.

There is a 'profile' button in the middle of the mouse that can be used to switch among 3 different 'profiles' for the left and right buttons.

Which profile is active is indicated by a color strip of light on the left and right sides of the mouse --- red, green, or blue.

In the 'blue' profile, the 2 right buttons issue a Ctl-C or Ctl-V command.

This Ctl-C is still not as nice as the 'swipe-with-MB1-down' kind of copy that I want to be able to do, trouble-free.

So I would like to de-activate the 2 right buttons.

But with no button numbers --- known to 'xinput' --- with which to map them to zero (no-operation), I do not have a way of de-activating the right buttons.

I will just have to be careful not to press them at a bad time.

To cut this presentation short, I ended up using the mapping '1 0 3 4 5 6 7 2 2 10 11 ...' --- which de-activates the 'paste' operation of the scroll-wheel and causes buttons 8 and 9 to act as 'paste' buttons.

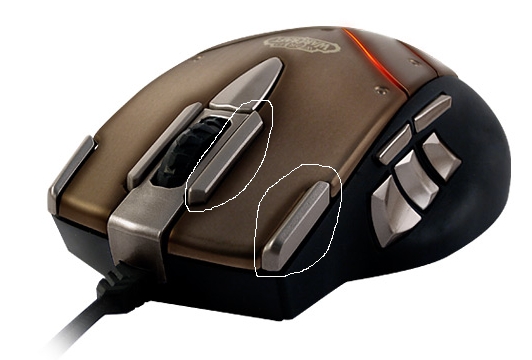
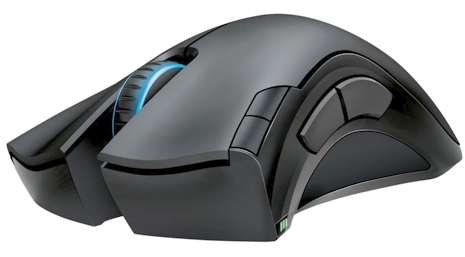
If the G300 does not work out, then I may try the Steel Series 'Legendary Edition' mouse --- which is similar to the Steel Series 'World of Warcraft' mouse, pictured above.

The Mad Catz Cyborg R.A.T. 7 mouse was on sale at BestBuy here last week (2013 Sep) for $80.

It has nice customization features like the ability to change the length of the mouse, as seen in the following image.


MadCatz Cyborg RAT7 mouse

But all I need is a mouse with ONE extra button on TOP of the mouse, in an easily reached location, which I can map to the 'paste' operation.

The 'Legendary Edition' mouse costs a little less than the RAT7, at Walmart.

I think I will try that before the RAT7.

They both get similar, mixed reviews on amazon.com.

---

I also have a Logitech M570 marble mouse with a couple of extra buttons on the top --- that I got to use with one of my netbook computers, when I am in a place (like an airport) where I do not have a flat surface to work on.

See the marble mouse image below.


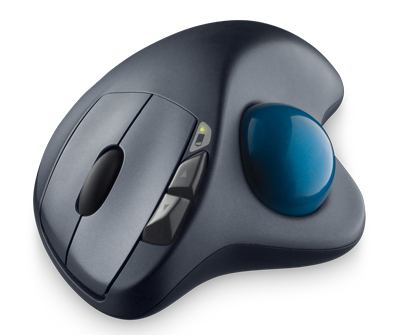
Logitech M570 wireless trackball

I can try the Logitech M570 if the Logitech G300 and the Steel Series Legendary-Edition do not work out.

---

Some code changes

By the way, I have changed the code above to include the mapping for the G300 mouse in the 'init_xinput_parms_array' proc.

    I may put commented code in that proc --- for suggested settings for a variety of mice that I have tested.

    The user can activate the code for the mouse that he/she uses.

I also made a small fix to the proc for the 'GETmap' button --- so that it changes an internal array holding the button settings, as well as changing the button mapping string shown on the GUI.

The 'GETmap' button can be handy to replace the mapping string with the settings that are currently active for the mouse.

For example, you can use GETmap when you first start up the GUI (and after setting the DeviceID) --- to see what your mouse is currently set to do --- either because of config file settings or because of log-in scripts --- or because of a default, because neither of those first two things exist.

More later (on results of test with various mouse models).

Bottom of this web page for
presenting Tcl-Tk code for
tkPointerSettings (an 'xinput' front-end)
--- a utility in the FE 'tkGooies' system,
in the 'SYSTEMtools' group.

To return to a previously visited web page location, click on the Back button of your web browser a sufficient number of times. OR, use the History-list option of your web browser.
OR ...

< Go to Top of Page, above. >

Page history:

The code was created in 2013 --- and posted 2013 Aug 08 at http://wiki.tcl.tk/38449.

This FE web page was created 2014 May 14.
(as a backup and alternative to the wiki.tcl.tk page)

This page was changed 2015 Oct 05.
(Small changes.)

Page was changed 2019 Mar 07.
(Added css and javascript to try to handle text-size for smartphones, esp. in portrait orientation.)

Page was changed 2019 Jul 06.
(Specified image widths in percents to size the images according to width of the browser window. Also added some web links.)


NOTE:
The code here MAY BECOME more 'up-to-date' than the code posted on the Tcler's Wiki ---
wiki.tcl-lang.org --- formerly wiki.tcl.tk.